3.4: Launch that rocket !!

image source: businessinsider.com
First task
The first task that the Arduino should do for us is oscillate a LED at 1 Hz. Tip:
Make one LED oscillate using the "Timer/Counter1 Overflow Interrupt"
- one LED oscillates at 1 Hz
Multiple tasks
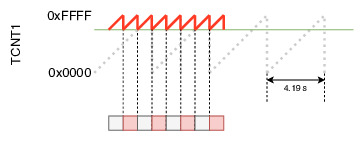
Let’s assume that one task is the original blinking LED which oscillates at 1 Hz. Now we want a second application which oscillates 3 times every second.
Make two LEDs oscillate at different frequencies using the "Timer/Counter1 Overflow Interrupt"
- one LED oscillates at 1 Hz
- one LED oscillates at 3 Hz
Start the countdown in … 3 … 2 … 1 …
The bare-metal \(rocket\) on the top of this page needs to be launched. Because of the huge amount of exhaust it should be triggered after a countdown. This gives the poor operator sufficient time to get to a safe distance.
After the launch is initiated through a serial port command (eg. 'L'), a countdown is started. The countdown starts at 10 and goes to 0. Once the countdown is ongoing, the 1 Hz LED should flash. In the final 3 seconds, the second 3 Hz LED should join the show. When the countdown reaches 0, both LEDs should stay on.
Pull-up resistor: https://www.youtube.com/watch?v=wxjerCHCEMg