6.3: Inter Process communication
Having multiple processes running is all good-and-well. Hey, it is one of the main reasons why the concept of an OS was introduced, remember? Right, good job!
It would make sense, though, if different processes were able to communicate with each other. That’s what this Section is about.
There are two main techniques to facilitate communication between multiple processes. These two techniques are shown in image below.
- Shared memory
- Message passing
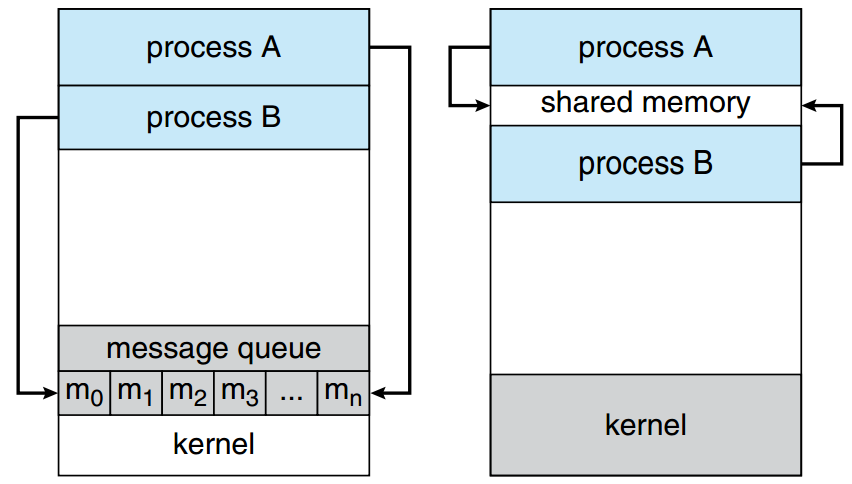
The two main techniques for inter process communication
source: SILBERSCHATZ, A., GALVIN, P.B., and GAGNE, G. Operating System Concepts. 9th ed. Hoboken: Wiley, 2013.
Shared memory
Shared memory is … memory that is shared. Normally multiple processes are not allowed to read/write to each other’s memory space. This is enforced by the OS and we’ll later discuss some details on how it does this. Errors, similar to the one in the example below, are generated by the OS if a processes try to access areas that it is not allowed to access.
#include <stdio.h>

int main(void) {
  int i, my_array[8];

  for(i=0;i<=20;i++) {
    my_array[i] = i+1;
  }

  for(i=0;i<8;i++) {
    printf("%d\n", my_array[i]);
  }

  return 0;
}
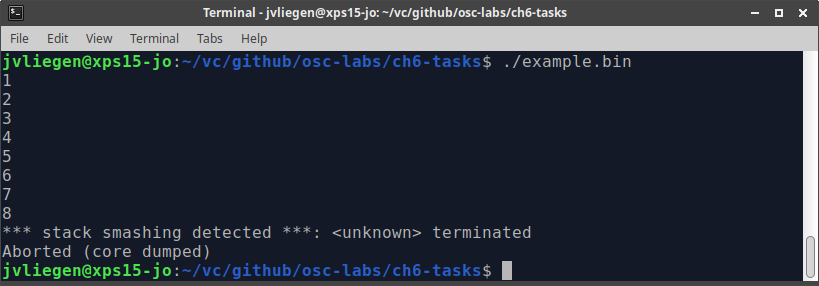
An example of memory protection that given by the OS
Note that, depending on the OS, the error message might vary: on MacOS, it’s simply [1] 28507 abort ./example.bin.
The code above exceeds the allowed stack space. Try to find out why this happens.
The technique of using shared memory allows other processes to gain access certain regions of the address space. Both processes have to be aware that the memory is not protected by the OS. A programming API for using shared memory is provided by POSIX (Portable Operating System Interface, a set of standards implemented by most UNIX OSes). The example below shows a producer on the left (a process which puts data inside of the shared memory) and a consumer on the right (which uses the data it gets from the producer).
// PRODUCER

#include <stdio.h>
#include <stdlib.h>
#include <string.h>
#include <fcntl.h>
#include <unistd.h>
#include <sys/shm.h>
#include <sys/mman.h>

int main() {
  const int SIZE = 4096; /* buffersize (bytes) */
  const char *name = "OS"; /* shared memory object name */
  const char *data_0 = "Hello";
  const char *data_1 = "World!";
  int shm_fd; /* shared memory file descriptor */
  void *ptr;

  /* create the shared memory file descriptor */
  shm_fd = shm_open(name, O_CREAT | O_RDWR, 0666);

  /* configure the size of the shared memory file */
  ftruncate(shm_fd, SIZE);

  /* memory map the shared memory file */
  ptr = mmap(0, SIZE, PROT_WRITE, MAP_SHARED, shm_fd, 0);

  /* write to the shared memory file */
  sprintf(ptr,"%s",data_0);
  ptr += strlen(data_0);
  sprintf(ptr,"%s",data_1);
  ptr += strlen(data_1);

  return 0;
}
// CONSUMER

#include <stdio.h>
#include <stdlib.h>
#include <fcntl.h>
#include <unistd.h>
#include <sys/shm.h>
#include <sys/mman.h>


int main() {
  const int SIZE = 4096; /* buffersize (bytes) */
  const char *name = "OS"; /* shared memory object name */


  int shm_fd; /* file descriptor */
  void *ptr;

  /* open the shared memory file */
  shm_fd = shm_open(name, O_RDONLY, 0666);


  /* memory map the shared memory file */
  ptr = mmap(0, SIZE, PROT_READ, MAP_SHARED, shm_fd, 0);


  /* read from the shared memory file */
  printf("%s",(char *)ptr);

  /* remove the shared memory file */
  shm_unlink(name);

  return 0;
}
source: SILBERSCHATZ, A., GALVIN, P.B., and GAGNE, G. Operating System Concepts. 9th ed. Hoboken: Wiley, 2013.
Note: to compile these on Linux, you need to pass the -lrt flag to gcc (“link with library rt”, see the librt interface documentation) like so: gcc -o producer producer.c -lrt. MacOS relies less on auxiliary external libraries; the flag can safely be omitted there.
This very simple example uses shared memory. Try to find answers to the questions below:
- Try to find out what these programs do
- What is the size of the memory that is shared?
- Can a producer read from the shared memory?
- Can a consumer write to the shared memory?
- How do both processes know which data is shared? In other words, how does the consumer decide which memory it connects to?
- Do both processes have to be active at the same time for the memory sharing to work? Why (not)?
Using shared memory is handy, but also not ideal in terms of security. For example, can you see any way in the API above to make sure only authorized programs can read/write to the shared memory? In this setup, any program which knows the name of the shared memory block and runs with sufficient permissions (remember chmod?) can also access the shared memory.
Message passing
The second technique for for InterProcess Communication (IPC) comes in the form of message passing. This method is a bit more restricted than using raw shared memory, but also easier to use and safer because of that. Here we touch on 2 different mechanisms for achieving this: signals and pipes.
Signals
Signals are the cheapest form of IPC. They literally allow one process to send a signal to another process, through the use of the function kill(). Although due to historical reasons the name might be a bit misleading (originally, the only defined signal was used to stop a process, other uses only came later), it can be used to send different signals. Signals here are very simply numbers with a predefined meaning (an “enum” if you will) that you can send to another process. Depending on the number received, a different action is expected to be taken. For example, if you use the Ctrl+c keyboard shortcut to stop a running program, the shell sends a SIGINT (signal interrupt) to the current program. Similarly, Ctrl+z will send a SIGTSTP signal.
The snippet below shows the different types of signals that can be sent. Many of them have to do with stopping other processes, but with subtly different effects (for example, stop a process—immediately—versus allowing it to safely exit itself).
jvliegen@localhost:~/$ kill -L
 1) SIGHUP   2) SIGINT   3) SIGQUIT  4) SIGILL   5) SIGTRAP
 6) SIGABRT  7) SIGBUS   8) SIGFPE   9) SIGKILL 10) SIGUSR1
11) SIGSEGV 12) SIGUSR2 13) SIGPIPE 14) SIGALRM 15) SIGTERM
16) SIGSTKFLT 17) SIGCHLD 18) SIGCONT 19) SIGSTOP 20) SIGTSTP
21) SIGTTIN 22) SIGTTOU 23) SIGURG  24) SIGXCPU 25) SIGXFSZ
26) SIGVTALRM 27) SIGPROF 28) SIGWINCH  29) SIGIO 30) SIGPWR
31) SIGSYS  34) SIGRTMIN  35) SIGRTMIN+1  36) SIGRTMIN+2  37) SIGRTMIN+3
38) SIGRTMIN+4  39) SIGRTMIN+5  40) SIGRTMIN+6  41) SIGRTMIN+7  42) SIGRTMIN+8
43) SIGRTMIN+9  44) SIGRTMIN+10 45) SIGRTMIN+11 46) SIGRTMIN+12 47) SIGRTMIN+13
48) SIGRTMIN+14 49) SIGRTMIN+15 50) SIGRTMAX-14 51) SIGRTMAX-13 52) SIGRTMAX-12
53) SIGRTMAX-11 54) SIGRTMAX-10 55) SIGRTMAX-9  56) SIGRTMAX-8  57) SIGRTMAX-7
58) SIGRTMAX-6  59) SIGRTMAX-5  60) SIGRTMAX-4  61) SIGRTMAX-3  62) SIGRTMAX-2
63) SIGRTMAX-1  64) SIGRTMAX
There is also has CLI-compatible command kill that can send these signals to any running process (addressed by their PID). For more information on the kill command, add the --help argument, read the man-page (man kill).
Let’s illustrate this with an example:
#include <stdio.h>
#include <unistd.h>

#define DURATION_IN_MINUTES 10

int main(void) {
  int i = DURATION_IN_MINUTES * 60;

  for(;i>=0;i--) {
    printf("TIMER: 00:%02d:%02d\n", (int)((i-i%60)/60), i%60);
    sleep(1);
  }

  return 0;
}
This program will emulate an egg timer. Every second it displays how much time is left. Once the process starts running, it takes 10 minutes to complete. This process can be stopped by just pressing CTRL+C. Note that you don’t have to manually do anything for this to work: your program automatically listens for this signal and exits the program when it is received. This is achieved through a combination of the gcc compiler (which adds code for signal handling) and the OS executing that code when needed.
jvliegen@localhost:~/$ ./egg_timer.bin
TIMER: 00:10:00
TIMER: 00:09:59
TIMER: 00:09:58
TIMER: 00:09:57
TIMER: 00:09:56
^C
Another way to kill the process would be to explicitly send the signal through the kill command. To use this command, the PID is needed as an argument. Through a new CLI-window, this PID has to be searched for first. Note that the type of signal is an argument in the command.
jvliegen@localhost:~/$  ps ux | grep timer
jvliegen  5041  0.0  0.0   4504   772 pts/1    S+   06:04   0:00 ./egg_timer.bin
jvliegen  5066  0.0  0.0  21996  1080 pts/2    S+   06:05   0:00 grep --color=auto timer
jvliegen@localhost:~/$  kill -KILL 5041
Try this for yourself. You can also use the ./longhello program from Section 6.1. Run this program and try to kill it using both approaches that were explained above. (Of course this means you shoud run it again, after you killed it the first time 😃 )
Although there are numerous uses for sending signals between signals, one more example is interesting to have a closer look at. Above there was already some hinting to CTRL+Z.
The CLI is running a shell, as you already know by now. This offers just a single interface. If you were to start a program, that CLI is occupied (you cannot type or execute any commands). Imagine you are working remotely on a server (e.g., through ssh): this would require you to open up a new connection to the server and have a second shell at your disposal every time you executed a longer running command (e.g., starting a web server). A more convenient solution would be to send the running program to the background.

An example of a program that needs to be killed with CTRL-C
Before you can send processes to the background, the process has to be halted first. This can be done through the CTRL+Z shortcut. With a halted process, the command bg sends the halted process to the background. If you do not send it to the background, the process will freeze. Once it is in the background it unfreezes and continues running. Additionally, this gives you back your shell.
jvliegen@localhost:~/$ xeyes
^Z
[1]+  Stopped                 xeyes
jvliegen@localhost:~/$ bg
[1]+ xeyes &
jvliegen@localhost:~/$
For the sake of completeness we enumerate a few more usefull aspects about this:
- a process can be started in the background as well. This can be achieved by adding an
&(ampersand) after the command (e.g.,xeyes &) - the command
jobsgives you an overview of which jobs are running in the background - through the command
fg <#>the job with index number <#> will pulled to foreground.
Try this for yourself. If the xeyes program is not installed, install it first or use the longhello program from before.
Pipes
Another option to achieve message sending is through pipes. There are two different types of pipes available:
- anonymous pipes
- named pipes
Anonymous pipes are like waterslides. You can put some data on it on one end (the top of the slide) and it comes out the other (the bottom), but it’s not possible to go up the waterslide from the bottom. Put differently: communication is half-duplex (single direction). One process can write into the pipe, while the other can read from of the pipe. This type of pipe can only be create between two processes that have parent-child relationship. What happens internally is that the stdout of the first process is mapped to the stdin of the second process. For this, we use the | (pipe) character.
When using the CLI, anonymous pipes are a very powerful tool for chaining different commands. The output of the first command will be the input for the next command. This can be chained multiple times.
jvliegen@localhost:~/$ xeyes &
jvliegen@localhost:~/$ ps -ux | grep xeyes | head -1 | tr -s " " | cut -d " " -f 3
5526
jvliegen@localhost:~/$
The example above chains the following:
- give a list of all my processes (
ps= process status) - only filter the lines that contain the word xeyes (
grepstands for Global Regular Expression Print) - filter only the first line (
head) - squash all spaces
psproduces together to better prepare for step 5: - split the input on a space (
" ") and report only the third field (which is the process ID)
Let’s try something similar for yourselves:
- Use anonymous pipes to display all the processes of which you are the owner. From these processes only display the PID and the first 10 characters of the process’s name (the COMMAND column). From this list, only show the first 10 processes.
- Then, add another command to sort the output by descending PID (so the largest PID is on top, the smallest on the bottom)
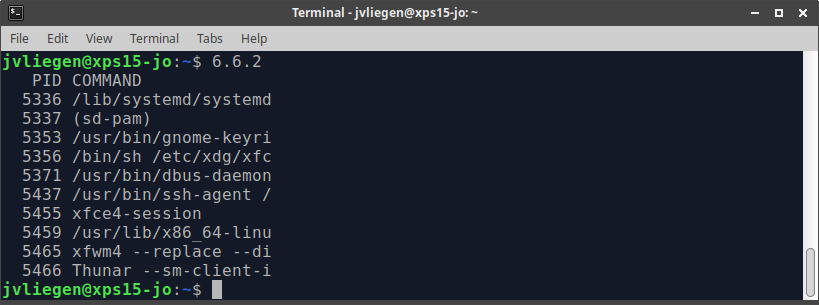
An example output
Do you remember the Process Control Block? This has one field called list of open files. We’ve already touched upon stdin, stdout and stderr. Using anonymous pipes will add an entry to this list.
We can also relink the 3 default open files to other targets. For example, instead of writing output and errors to the command line, we can redirect them to a file. Similarly, we can read input from a file instead of from the keyboard:
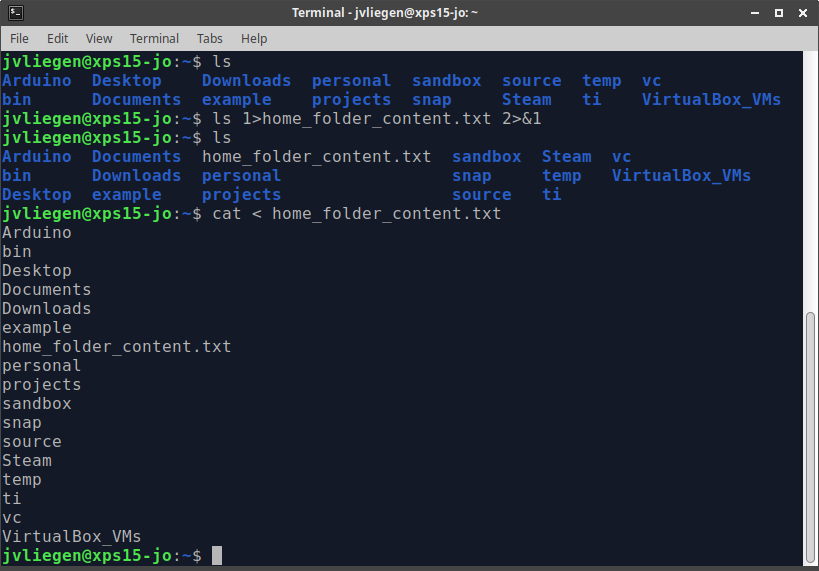
Redirection of the standard output
The syntax for this is a bit weird though: 1> is meant to redirect data that normally goes to stdout, while 2> is used to relink stderr. You can also point directly to the existing stdout/stderr by using &1 or &2 respectively:
- process 1>{STDOUT} 2>{STDERR}
- process 1>{STDOUT} 2>&1
- process < {STDIN} (read from a file at location {STDIN} rather than from the keyboard)
Note that here we’re using the > pipe here instead of | as above. The difference is subtle, but a simple explanation is that > deals with mapping a command to a file (or something that pretends to be a file, like stdout/stderr), while | maps a command to another command.
Since STDIN is “just a file” in Linux, we can also read from that file to get input into our program.
Look up yourself online how to read data from STDIN and write a small C program that reads (some) data from STDIN and prints it to STDOUT using printf().
Then use a command like this to have data from 1 file pass through your program and into another:
cat input_file.txt | ./my_program 1> output_file.txt
Also try to do input_file.txt > ./my_program 1> output_file.txt and explain why that doesn’t (seem to) work.
Named pipes are the other type of pipes that can be created. The main differences with anonymous pipes are the lifetime of this mechanism and their presence in the file system.
The anonymous pipes above only live for as long as the processes live. Named pipes instead persist and have to be closed explicitly (or are closes automatically at system-shutdown).
Named pipes also have an actual presence in the file system. That is, they show up as files. But unlike most files, they never appear to have contents. Even if you write a lot of data to a named pipe, the file appears to be empty. Making named pipes can be done through the mkfifo command.
As they are not frequently used, we direct the interested reader to man pages.