5. Data Storage: File/Network
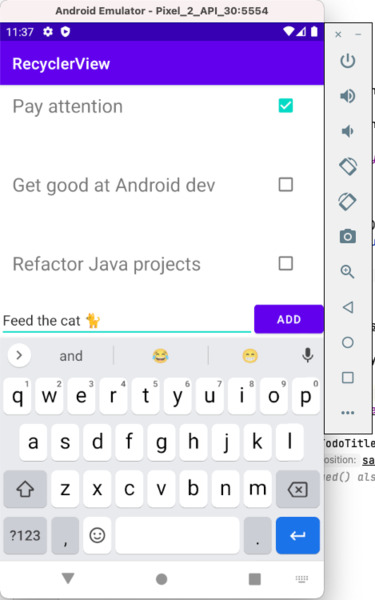
Suppose we’d like to store the TODO elements in the example from the nested views chapter. Remember that TODO app, where you could check off several items and add new ones? Every time we reboot that app, our newly added items and checked state—the data, so to speak—is gone.

There are several possibilities to tuck away and re-retrieve the above data:
- It could be part of Android’s preferences system: simple key/value pairs accessible through the Activity API: it doens’t get any simpler than this.
- It could be simply written to a file. You should be familiar with JSON serialization, we’ve used it in INF1 while getting to know Java with the help of the GSON library from Google.
- It could be part of sharable Media, usable through the
MediaStoreAPI. This allows different apps to share data, but requires extra permissions! - It could be stored in a real database. That database could be a simple local SQLite file. The databases course is reserved for the third academic year, but a simplistic example will be handled in this chapter.
- It could be stored remotely: on another website, accessible only through the internet via for example HTTP GET calls.
In this chapter, we’ll see how we store and retrieve data in Android apps.
Carefully consider which of the data storage solutions is right for you. Do you want your data to be persisted after the user uninstalls your app? Do you want it to be sharable? Do you want other (web)applications to be able to access it?
This isn’t a case of picking an appealing technology but of picking what is appropriate for the thing you’re trying to achieve.
Before being able to save the TODO items, we need to enable two-way data binding. Until now, the TODO items in the view were synced based on the values in the backend. Go to the Todo adapter, and add a click listener to chkTodoDone. When it is clicked, we want to re-sync the state with the current todo item (in onBindViewHolder()). It needs to go both ways, otherwise we don’t have any data to save:
val checkBoxTodo = findViewById<CheckBox>(R.id.chkTodoDone)
checkBoxTodo.isChecked = currentTodoItem.isDone
checkBoxTodo.setOnClickListener {
    currentTodoItem.isDone = checkBoxTodo.isChecked
}
Why use findViewById<>() instead of binding.chkTodoDone? Because the latter does not exist in the binding of the activity but in the binding of the recyclerview.
Also, think about at what point exactly to save and load. Should it be onDestroy()? Somewhere else? Consult the activity/fragment licecycle diagram to determine the best suited event. Remember that some events do NOT get triggered on force closes/crashes/etc. Treat loading as if things were never saved if things go awry: always have backup plan.
1. Preferences Access
There are two kinds of preferences:
- The ones shared by a single activity, accessible through
getPreferences()on the activity. - The ones shared by your whole app, independent of the view/activity, accessible through
getSharedPreferences().
The rest is simple enough:
// reading
val sharedPref = activity?.getSharedPreferences(
        getString("key"), Context.MODE_PRIVATE)

// writing
val sharedPref = activity?.getPreferences(Context.MODE_PRIVATE) ?: return
with (sharedPref.edit()) {
    putString("key", "Hi, I'm a value!")
    apply()
}
The value you save can simply be a GSON-ified JSON String representation of an object. Remember the statement gson.toJson(object) that outputs a string? That one. Another possibility is a forEach {} loop for every key to put away.
YOu do not need special permissions to store private shared preferences: see the Context MODE_PRIVATE Android dev docs.
2. File Access
Private file access is also trivial: grab hold of a FileOutputStream through the context.openFileOutput(fileName, Context.MODE_PRIVATE) context API. Again, as long as you stay within MODE_PRIVATE (see above), these files are not shared between apps, and therefore, no special permissions are needed.
Be sure to check for possible exceptions: for instance, FileNotFoundException might occur, or what to do when the file is corrupt? These situations are best handled in a separate class, such as a repository, as also done in the SES course.
Write to the output stream as you would in any other Java code: using readObject() and writeObject(). Examples are available in the demo project at examples/kotlin/todosavestate.
3. Database Access
Simple object serialization might do in simple cases, but more intricate apps gravitate towards the use of databases. SQLite, the in-memory or in-file SQL database solution, also works with a single (private) file behind-the-scenes, meaning no additional security measurements are required. The usage of SQLite on Android is simplified thanks to Room, an easy-to-use API part of Android Jetpack. Again, be sure to import the necessary dependencies:
plugins {
    id("kotlin-kapt")
}
dependencies {
    val room_version = "2.3.0"
    implementation("androidx.room:room-runtime:$room_version")
    implementation("androidx.room:room-ktx:$room_version")
    testImplementation("androidx.room:room-testing:$room_version")
    kapt("androidx.room:room-compiler:$room_version")
    // only for Mac M1 users: kapt("org.xerial:sqlite-jdbc:3.34.0")
}
Note that room_version is subject to change—consult the above Jetpack URL to grab the latest version!
Mac M1 users might be greeted with weird build-time exceptions, with underlying caused by No native library is found for os.name=Mac and os.arch=aarch64. In that case, add another kapt dependency: kapt("org.xerial:sqlite-jdbc:3.34.0").
Configuring your objects/Dao
To use Room, it suffices to apply a few key annotations on both our Entity (the Model, the object we wish to persist) and on a newly created Dao interface.
@Entity
data class Todo(
    @ColumnInfo(name = "title") val title: String,
    @ColumnInfo(name = "is_done") var isDone: Boolean,
    @PrimaryKey(autoGenerate = true) var id: Int = 0)
This is indeed very reminiscent of JPA’s @Entity annotations, but make no mistake, these are Android Room-specific. Take a look at the 3rd year database course: JPA chapter if you’re curious about next year’s course contents. If you’re fluent with Android’s Room and SQLite, you’ll have no problem tackling that course.
Next, create a new interface called TodoDao, where your SQL actions will live:
@Dao
interface TodoDao {
    @Query("SELECT * FROM Todo")
    fun query(): List<Todo>

    @Insert
    fun insert(items: List<Todo>)
}
An implementation will be generated for you, accessible through a third (abstract!) class we call TodoDatabase:
@Database(entities = arrayOf(Todo::class), version = 1)
abstract class TodoDatabase : RoomDatabase() {
    abstract fun todoDao() : TodoDao
}
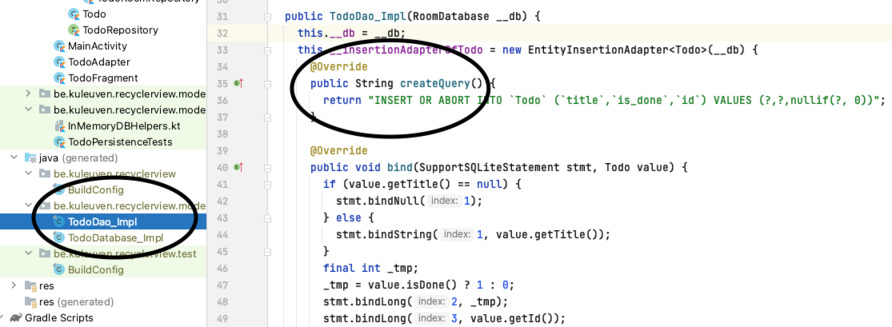
Kotlin’s kapt compiler plugin, which stands for Kotlin Annotation Processor, is responsible for processing the above classes, and generating two implementation files: TodoDao_Impl and TodoDatabase_Impl. The queries that are simply annotated live in there:

If you ever wondered which exact query an annotation such as @Insert without any arguments generates, take a little peek there. It’s also possible to log queries as they get executed, but it involves sub-performant hooks. An example can be found in the TodoPersistenceTests unit tests class in the course repository.
Executing your repository methods
Note that the accessing data using Room DAOs guide states the following:
Note: Room doesn’t support database access on the main thread unless you’ve called allowMainThreadQueries() on the builder because it might lock the UI for a long period of time. Asynchronous queries—queries that return instances of LiveData or Flowable—are exempt from this rule because they asynchronously run the query on a background thread when needed.
This means we can’t simply call our find() or insert() queries straight form the activity/fragment. There are multiple solutions to this problem, and since the concept is fairly complex (it involves live data), we went with the simplest one, adding .allowMainThreadQueries() to our database builder. Remember that this isn’t without possible consequences! However, for the purpose of this course, making use of this shortcut is sufficient.
The builder creates an instance of TodoDatabase, on which we can call todoDao() to access the DAO (Data Access Object) implementation to get and store our TODO items:
db = Room.databaseBuilder(appContext, TodoDatabase::class.java, "todo-db")
    .allowMainThreadQueries()
    .build()
dao = db.todoDao()
That’s it, now we can call query() and insert() from our activity/fragment! The above appContext which is needed to build the database object is the Application Context of an activity.
To correctly unit test and debug your database, please refer to the android developer guide. Since the database requires an application context, it’s best to create instrumented tests. See the TDD chapter for more information. Samples are, again, to be found in examples/kotlin/todosavestate in the repository.
In case you store sensitive information in your database, consider using SQLCipher to encrypt the database. A Room plugin is available that injects the correct configuration through the database builder objects. See the security by design chapter. This is out of scope for this course.
A few more pointers for the database savvy students:
- It is possible to store Bitmaps in Room with a
ColumnInfo.BLOGtype and abyte[]property type. - Saving relations to other is also possible using
@Relation.
4. HTTP Network Access
Volley is Android’s Go-To HTTP client that comes with advanced caching mechanisms built-in: see the android dev guide on volley. Be prepared to add yet another dependency. To access the internet in our app, we’ll have to add the android.permission.INTERNET permission in the app’s manifest file.
Let’s try to create a simple GET request and print out the results. In Volley, all requests are put in a queue: HTTP calls are asynchronous! This means we can’t simply return results: it needs to be handled in a callback. Welcome to async hell—those who’ve struggled with it in JavaScript will know what to expect.
val queue = Volley.newRequestQueue(context)

val req = StringRequest(Request.Method.GET, "https://www.google.com", Response.Listener<String> {
    println("cool, we've got a result: $it")
}, Response.ErrorListener {
    println("whoops, something went wrong: ${it.message}")
})
queue.add(req)
The two parameters, a response listener and error listener, are anonymous interface implementations with a single method.
In most cases, a GET without any header does not suffice. Instead of a StringRequest, you can also create a JSONObjectRequest and pass in a JSONObject as your request body. Fully customized HTTP calls are best handled by implementing your own request object. This allows you to:
override fun getParams(): Form parameters in case of ax-www-form-urlencodedrequestoverride fun getBodyContentType()to specify a customContent-Typeoverride fun getHeaders()to specify other custom headers
The todosavestate code contains an example of such a custom request object.
Be warned (again): Volley is asynchronous, meaning “return bla” on response just won’t work. To make things work, you’ll have to (1) show a loading widget, (2) fire off the HTTP call by adding it to the queue and (3) do your thing on response, also not forgetting to update the UI. In case of a RecyclerView, that’s notifyDataSetChanged(). Watch out with multithreading and changing UI logic!
The example shows how you can still pass along a custom response handler object by making use of Kotlin’s SAM interfaces.
In case of network exceptions, be sure to check the error message. IO procedures are prohibited on the Android Main thread. The demo project shows how to deal with it using Kotlin’s coroutines in case you execute synchronous network-related code (optional).
Volley can be confusing and difficult to use. It’s a complimentary library, meaning it can be swapped out at any time in favor for alternatives such as Retrofit. Feel free to do so. The How Long To Beat demo project also utilizes Volley—feel free to rummage through its source code.