3. Complex layouts: Fragments
See also: Android developer guide: fragments.
What’s a fragment?
A fragment is, simply put, a reusable UI portion of an activity. For example, the welcome message from the activities chapter can be a separate fragment, and the image containing the avatar of the user can be a separate fragment. Fragments are programmatically created by extending from Fragment from package androidx.fragment.app.
From the docs:
A Fragment represents a reusable portion of your app’s UI. A fragment defines and manages its own layout, has its own lifecycle, and can handle its own input events. Fragments cannot live on their own–they must be hosted by an activity or another fragment. The fragment’s view hierarchy becomes part of, or attaches to, the host’s view hierarchy.
Until now, we have not explicitly used fragments: we have directly created UI components on top of activities by dragging them in the design editor onto the designated layout. In most cases, that would be a single ConstraintLayout that uses constraints to specify where that particular button and text input component should be placed. When integrating fragments into an activity, these things do not change: instead of putting them directly onto the activity, you simply configure them on the fragment, and put one or more fragments onto an activity. In other words, it’s another abstraction layer.
A few things to remember:
- Fragments have their own lifecycle
- There’s always an activity that holds one or more fragments (the parent container), and fragments are affected by the lifecycle of the activity.
Why use fragments? Reusability/Modularity
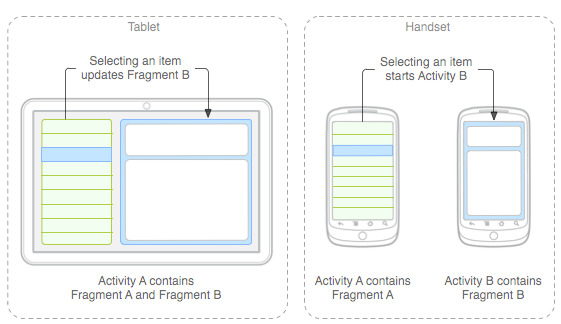
The easiest way to demonstrate its use is through the following schematic:
Suppose we develop an Android app that we know will be running on:
- A tablet with a big screen, where people usually hold it horizontally.
- A smartphone with a smaller screen that is usually held vertically.
On that smartphone screen, because of the dimensions, not all UI components can be shown at once. As a concrete example, just think about any master/detail screen you’ve ever used in a tablet or on a smartphone: the master screen, that displays a list of things to select, is always shown first, while after selecting something, the detail screen appears. On a tablet device or on a PC, we can show both screens at the same time! This effect is visible in your typical Mail client:

Instead of designing two separate applications, we want to encapsulate these into a single one where we simply re-use the master part and the detail part! On a smaller screen, we split those into two separate activities. On a bigger screen, we simply show them both at once. Thus, we need something to capture the essence of this principle: hence the concept of fragments.
Creating fragments
Just treat them as UI components. That is, they are also defined in the layout .xml files, and they are also a part of your ConstsraintLayout (constraints omitted for brevity):
<fragment
    android:name="be.kuleuven.fragmentswitcher.FirstFragment"
    android:id="@+id/myfragment"
    android:layout_width="match_parent"
    android:layout_height="0dp" />
As with activities, they need their own Java/Kotlin class, so make sure to add the needed classes. (Rightclick, new -> Fragment -> Blank, this automatically creates the layout file. If your fragment is called FirstFragment, the layout file will be fragement_first). The gray <fragment/> box indicates just a section of the activity that will be replaced as fragments get swapped in and out! That means we don’t need to (re)create an entire activity, and the fragment can be re-used.
In the simplest possible form, the fragment companion class looks like this:
class FirstFragment : Fragment(R.layout.fragment_first)
public class FirstFragment extends Fragment(R.layout.fragment_first) { }
Instead of returning inflater.inflate(R.layout.fragment_first, container, false) in an override of onCreate(), as you’re used to do when creating Activity classes, simply pass your fragment ID to the super constructor. onCreateView() is the function where your view properties should be set, and not in onCreate(), where you’d likely put it if you’re used to working with activities.
The android:name property in the XML refers to the class name of the fragment you initially want the fragment container to hold. Boot up the application, and you’ll see your first fragment layout in the activity. However, if you want to change dynamically, change the fragment to a <FrameLayout/>, remove the name, and let’s add some code in the MainActivity onCreate():
val firstFragment = FirstFragment()
supportFragmentManager.beginTransaction().apply {
    replace(R.id.fragmentContainer, firstFragment)
    commit()
}
FirstFragment firstFragment = new FirstFragment();
Transaction transaction = supportFragmentManager.beginTransaction();
transaction.replace(R.id.fragmentContainer, firstFragment);
transaction.commit();
You can only replace container elements with fragments. That is, elements that extend from android.view.ViewGroup—otherwhise, you’ll get a beautiful ClassCastException. Be sure to thoroughly inspect any stacktrace you encounter!
See also: android dev guide: fragment transactions. Reboot the application and you’ll still see the first fragment. Use the same code in button click listeners to dynamically change when your application is running.
Fixing the back button
While interacting with fragment-based applications, your users will likely expect the back button to work properly. That is, when they press “back”, they expect the previous “screen” to be shown. Whether that is an activity or a fragment is an implementation detail, not something an end user should be bothered with! However, replace() does not suffice. Add a call to addToBackStack() before the commit() and that problem is fixed.
Everything in Android is pushed onto a stack. When the user wants to go back, an item is popped off the stack. When the user navigates to another screen—be it activity or fragment—, an item is (or should be) pushed onto the stack. Think of it as browsing the web using your cellphone. When you click on a link, and you decide you don’t like that site, you likely want to go back. How to go back? By pressing that < button, the previously loaded website suddenly reappears. This navigational experience is very important to smartphone users, and something Android app developers will want to emulate: using the back stack.
Read more about the back stack in Android dev guide: understanding tasks and the back stack.
The lifecycle of a fragment
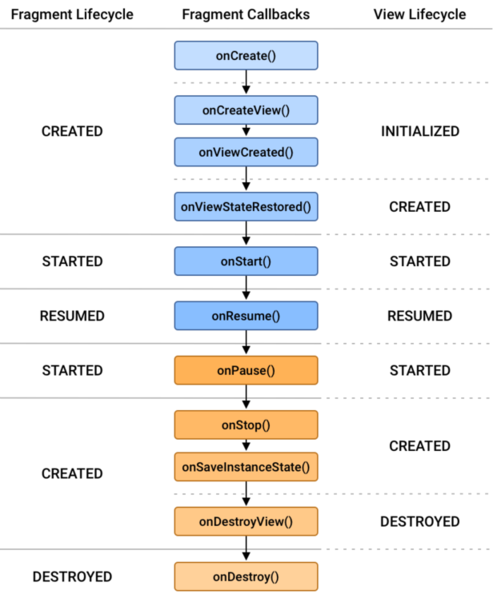
See Android dev guide: fragment lifecycles. Another reminder that fragments have their own lifecycle, but are still affected by activity lifecycles. For example, onCreateView(), as mentioned above, does not exist in the activity lifecycle diagram, but does here:
The biggest difference (and mistake to make) is to NOT access UI components in onCreate(), as the view isn’t initialized yet.
Sharing data between fragments
The Android-recommended way to share data is to utilize viewModels, which are separate classes that can be bound to UI components to automatically update properties. However, this concept is out of scope for this course.
A simpler, but more crude, way to exchange information is to simply create a separate class, acting as a model, and to set state on that shared instance. Pass it along the fragment’s constructor. See examples/kotlin/FragmentSwitcher in the course git repository for code examples.
Why use fragments? Easing navigation
See Android Dev Guide: Navigation - getting started
Remember the wireframe figure from the activities chapter?

To navigate form one activity to the next, we simply created an Intent that starts the next one. This works for simple apps, but does not for more intricate designs: many different screens and many different ways to direct the user from one part to the next make manually creating and calling startActivity() not only cumbersome, but also buggy.
Instead, the Android toolkit has a navigational component built-in, which leverages fragments to do the dirty work. Here, we create a single activity but use a fragment container, as explained above, to hop from one fragment to the next. Instead of coding the navigation by hand, we leverage what is called a navigation graph, which is—again—XML to describe how fragment x gets replaced by fragment y.
As an example, here are two fragments, where fragment 1 contains an action to go to fragment 2:
<?xml version="1.0" encoding="utf-8"?>
<navigation xmlns:app="http://schemas.android.com/apk/res-auto"
    xmlns:tools="http://schemas.android.com/tools"
    xmlns:android="http://schemas.android.com/apk/res/android"
    app:startDestination="@id/blankFragment">
    <fragment
        android:id="@+id/blankFragment"
        android:name="com.example.cashdog.cashdog.BlankFragment"
        android:label="fragment_blank"
        tools:layout="@layout/fragment_blank" >
        <action
            android:id="@+id/action_blankFragment_to_blankFragment2"
            app:destination="@id/blankFragment2" />
    </fragment>
    <fragment
        android:id="@+id/blankFragment2"
        android:name="com.example.cashdog.cashdog.BlankFragment2"
        android:label="fragment_blank_fragment2"
        tools:layout="@layout/fragment_blank_fragment2" />
</navigation>
These fragments will be placed in a container view in your main activity, which acts as the navigation host: an empty container where destinations are swapped in and out of. Therefore, the main activity XML only needs to contain one element, where all the navigation will take place:
<?xml version="1.0" encoding="utf-8"?>
<androidx.constraintlayout.widget.ConstraintLayout
    xmlns:android="http://schemas.android.com/apk/res/android"
    xmlns:app="http://schemas.android.com/apk/res-auto"
    xmlns:tools="http://schemas.android.com/tools"
    android:layout_width="match_parent"
    android:layout_height="match_parent"
    tools:context=".MainActivity">
    <androidx.fragment.app.FragmentContainerView
        android:id="@+id/nav_host_fragment"
        android:name="androidx.navigation.fragment.NavHostFragment"
        android:layout_width="0dp"
        android:layout_height="0dp"
        app:defaultNavHost="true"
        app:navGraph="@navigation/nav_graph" />
</androidx.constraintlayout.widget.ConstraintLayout>
Note the app:navGraph property, which points to the first XML file. Do not forget to add the necessary Gradle dependencies, as the navigation components reside in separate library files: see the getting started link from the Android Developers Guide.
Putting it all together
To use navigational components, we so far did the following:
- Add a
FragmentContainerViewand remove everything else in our single activity. - Create a new XML file called
nav_graph.xmlin theres/navigationdirectory (rightclick on res -> New -> Android Resource File, choose “Navigation” as Resource type and remember the name). - Add all fragments to the navigation and set the first one as the starting one.
- Add an
<action/>to the first fragment to navigate to the second one.
Now all that is left is executing the action, called action_firstFragment_to_secondFragment, for example on click. Go to your first fragment, which is already view binded, and add the following in onCreateView():
binding.btnGoToNext.setOnClickListener {
    val bundle = bundleOf("mydata" to data)
    findNavController().navigate(R.id.action_firstFragment_to_secondFragment, bundle)
}
If you’re in an activity, findNavController() won’t work, you’ll have to explicitly pass in the navigation host fragment ID using for example findNavController(R.id.nav_host_fragment).
Remember to enable the necessary serialization plugins if you want to pass objects through bundles—otherwise, stick with primitive values. See the intents chapter.
On the receiving side, you can pluck out the arguments fairly easily:
data = (arguments?.getSerializable("mydata") as MySharedData?) ?: MySharedData()
if(arguments != null) {
    object mydata = arguments.getSerializable("mydata");
    if(mydata != null) {
        data = (MySharedData) mydata;
    } else {
        data = new MySharedData();
    }
} else {
    data = new MySharedData();
}
Note how the elvis operator (?:) and the optional operator (?.) make things much, much easier in Kotlin, compared to a bunch of ugly if’s in Java.
And that’s it, now we’ve connected all the separate pieces together using a navigation graph XML file!
See examples/kotlin/FragmentSwitcherWithNavigation in the git repository. Compare the source code to the one without the navigation to see the difference between manually switching fragments and letting the navigation tool do its thing. Remember that these are tiny examples: real-world apps have a bit more than merely two fragments…
There’s only one thing left to learn before we can easily tackle a responsive master/detail screen such as the above Mac Mail screenshot: RecyclerViews.

